


Bad kitty! Even when she sits on top of my newly done layouts I can't be too mad at her because she is too cute!
Wednesday, May 31
Monday, May 29
Saturday, May 27


Friday, May 26

Monday, May 22

Saturday, May 20

Thursday, May 18


Wednesday, May 17

Tuesday, May 16


Monday, May 15
This week I want to introduce the concepts of aperture and shutter speed. I know not all of you have manual cameras and so this information won't be useful right now, but it is still interesting to know. I decided not to recreate the wheel because I found a pretty good online tutorial about this, so I will just link you to it.
Aperture and Shutter Speed
If you can do the suggested assignments at the end of the tutorial that would be great. I plan to try them out myself this week.
For those without manual cameras this week you can focus on experimenting with different lighting. A good experiment to do is to take a photo of the same object, or place at different times during the day so that you can see how the different lighting affects the photo you end up with. Here are some good online resources
Fodor's Lighting info
Lighting sources and direction
Light
Wondering when (and if) to use your flash? Check out these links
Making the most of your flash
Techniques for better on camera flash
Happy Shooting!

Thursday, May 11

Wednesday, May 10


Here is the information I have posted on Diversity Designs for the Photo Challenge. Every week I post an overview of a topic, and then in theory people use that information (or not!) to take their photos every day.
Week 1
I know I know, camera manuals are not a fun read. Mine has sent me to sleep more than once. But after having my nice new camera for a month and still taking bad pictures I realized I needed to have some idea of what I was working with.
I don’t expect that we will learn everything this week, but just at least have an idea of what our cameras can and cannot do, as well as knowing where to look when we want more information.
Part A
Take a look at the schematic at the beginning of the manual that describes all the bits and bobbles of your camera. Make a note of the ones that you want to learn more about, and also where in the manual you can get more information. One of the things I’d like you to find out and post here is whether your camera manual capabilities. That will help me in the future weeks when I am posting more information.
Part B
This week I want us to try using modes other than the automatic mode. Your camera might be equipped with a dial that has numerous symbols on it. I’ll describe the most common ones here. If I missed one that your camera has, tell us about it!
Anti-blur (a torso surrounded by bracket like lines) – self-explanatory: this function helps you avoid shaky blurry pics – use for moving objects
Portrait- (a head)- used for taking portraits, this mode allows you to get clear close up shots of faces with a blurred background
Macro- or close up (a flower) this is the perfect mode to take close up shots of details of subjects like flowers and insects. This is perfect for when you want to fill your frame with whatever you are shooting. Check your manual to see what is the closest distance you can use this mode at.
Landscape mode (mountain peaks) – for taking shots of sweeping landscapes. This mode keeps everything in focus, from the object closest to you to the mountains in the distance. This is also good for taking shots of people in front of scenery.
Sports mode (man running) For all those action shots. This mode “stops” the motion. Use not only for sports or kids in motion, but also for animals and flowers blowing in the wind.
Night mode: (a moon and star, or a face and star, or a house and moon) – Gives a much more balanced look to a photo taken at night. It is recommended that you use a tripod with this function, or the subject will be in focus against a blurred background (unless that is the look you are going for of course!)
Some cameras also have modes for Self-portrait, snow, party and fireworks. My camera which is a bridge, also has the following modes –
P: which is Programmed Auto. This is the mode I use most often, it’s not quite auto because you can make adjustments to aperture and shutter speed (topics we will cover next week)
A: Aperture Priority: in this mode I can make adjustments to aperture
S: Shutter Priority: in this mode I can make adjustments to shutter speed
N : Natural Light mode: Great for low light conditions when you can’t use flash, like sleeping babies, candlelit servies
M: Manual Focus – This one I have never tried!
Week 2
This week we’re going to build on last week’s topic a bit. I’d still like us to work with using different photo modes, but also want to introduce some basic concepts of photo composition. Composition is a huge topic as I discovered, but I will attempt to give you some ideas, because I think that’s one of the things we would like to be better at as scrappers.
The first tip is to get close to your subject. In looking at many of the photos I took before I was a scrapper, I notice that I have a lot of unnecessary elements in the background. Lots of greenery, scenery and buildings, and just a tiny person floating somewhere in the middle. I think when we’re taking a photo we have a tendency to want to capture everything, and while this may be great for landscapes, it’s not so much for photos of people. So get closer to your subject, then even closer. Try to see how much you can fill your frame with whatever it is you truly want to capture. (of course with digital photography and programs like Photoshop we can crop out background easily, but why have to do an extra step?) Also give some thought to whether you should be taking the shot with the camera held horizontally or vertically.
Secondly there’s what’s known as the Golden Rule of Photography, or the Rule of Thirds. Most people tend to compose a photo with the main subject smack dab in the middle of the frame. That’s the way our mind works, but is it really the way we want our photo to look? To use the rule of thirds what you do is to divide your viewfinder into thirds both vertically and horizontally, ending up with a diagram that looks like the frame for a game of tic-tac-toe.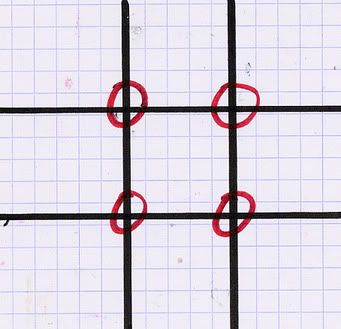
Now place your main subject on one of the 4 intersecting points. Another way to use this, especially for landscapes is to place things like mountain ranges, the sky, or the horizon in one of the horizontal thirds of the frame.
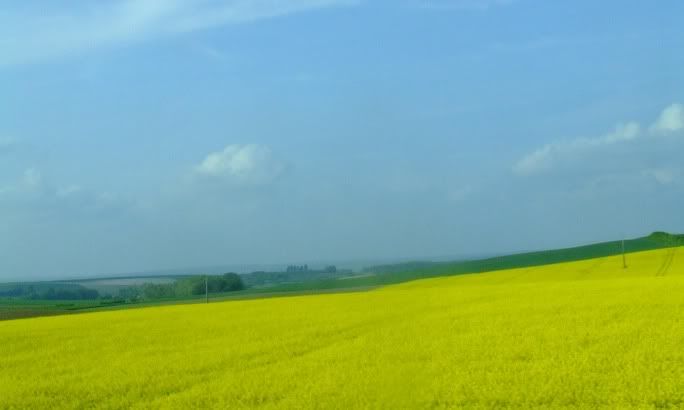
Look at these two photos (taken of the lavender fields in Provence last summer). In the first one the earth and the sky are evenly divided with tthe horizon in the middle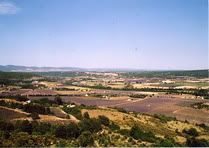
In the second photo, the sky occupies only the upper third, with the mountains in the middle and the fields in the foreground.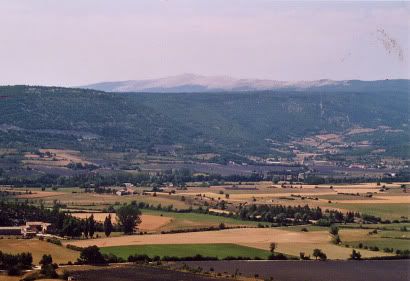
One of the neat things about digital cameras these days is that many of them include a function where you can see this tic-tac-toe frame on your screen. If you have this function, try using it! If you don’t then you have to eyeball it. Spend some time looking at what you’re photographing and see how you can apply this rule before clicking the shutter.
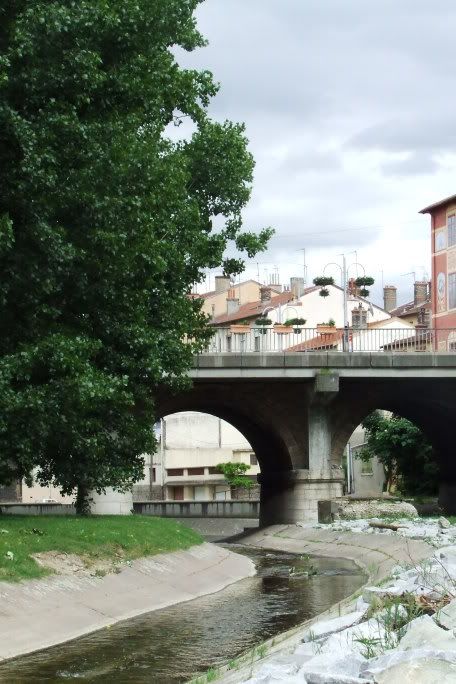
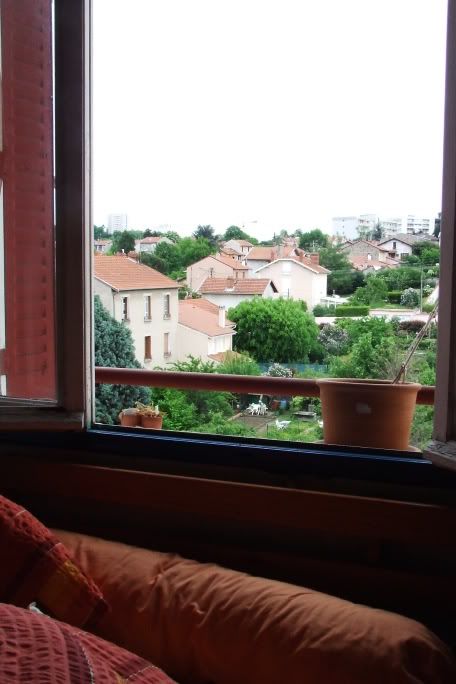
The third idea is that of framing. This is where you use things that are in the foreground of the scene you’re photographing to “frame” the main subject. You can use natural frames like tree branches, or even a window frame, by taking a photo of the outdoors from inside and including the frame in your composition. Framing your subject helps to lead the viewers eye through the photo. Here’s a photo that my dh took in downtown Lyon that illustrates this.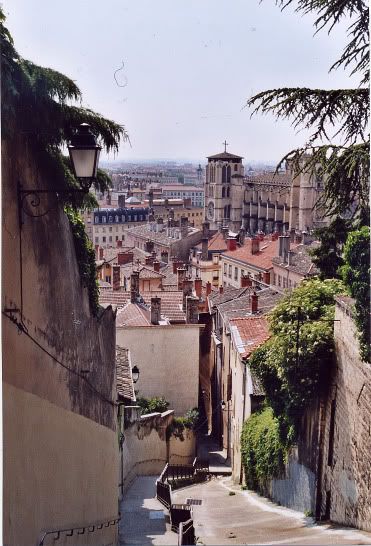
Other ideas for frames: taking a picture through rock formations, architectural elements like doorways and archways, even fancy sculptures. How about those tube like things at your kid’s playground? That might make a cool photo!
One last thing is point of view. When you see something cool that you want to take a photo of, if possible walk around it and see how it looks from different angles. Get up high, go down low, really look at your intended subject before clicking the shutter.
Here is a list of things to try to photograph this week. You don’t have to follow these unless you want to, the key here is to experiment, but if you need some guidance here are some ideas.
Cityscape at night and during the day
Any landscape
Close up of a flower
Your child or pet running or jumping
A totally abstract photo of an item. Get so close that we shouldn’t be able to tell what the item is at first glance.
A tree or building photographed against a clear sky
A photo that uses framing
A series of 3 or more photos of the same subject taken at different distances
A still life – fruits, flower in a vase etc.
Happy Shooting!
Next week's topic will cover more information on shutter speeds and aperture. Check back Monday!
Tuesday, May 9

Monday, May 8
ok, I am reviving this blog if it kills me! LOL It's not like I haven't been taking photos practically every day, I just haven't been uploading them here. Well now I am leading a Photo a Day challenge on the Photography Board on Diversity Designs, so that's a good reason to get this going again.
Subscribe to:
Posts (Atom)

